

This guide was submited by k97513 to r/globaloffensive.
Creating the server
Go to Google Cloud, log in, and click “Get started for free”.
Fill out any additional information, and begin your one year trial, with $300 credit.
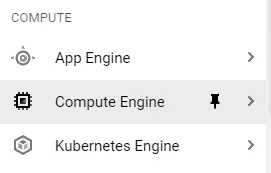
Click on “Compute Engine” on the left sidebar (You may have to open the menu):
Select “Images” on the left-hand side, and search for ubuntu-2004
Select either option, although I would recommend the newest release.
Once in the image details menu, select “Create Instance” at the top. This will bring you to a setup screen for your server.
Name your server, select a region closest to where you will be playing from, and choose a machine configuration. Generally, 2 vCPU and 8 GB (e2-standard-2) will be enough for a practice server, while you may want to upgrade if you’re planning on running 5v5s. Pricing for each configuration
Scroll down to “boot disk”, press “Change”, and enter 50 for “Size (GB)”. Unless you plan on uploading a lot of files and configs, 50GB should be plenty for your server.
Click “Create”, and your server should be created!
Setting up server connections
Configuring the IP address**
Click on your server from the VM Instances page, and bring up the server details.
Scroll down to Network Interfaces, and take note of the Primary Internal IP.

Click on “View details”
Select “External IP addresses” on the left-hand side
Change the type of your IP address to “Static”, and take note of the external IP address

Configuring the firewall to allow connections to the server
Select “Firewall” on the left-hand side
Click “create firewall rule” at the top
Name your firewall rule
For “Targets”, select “All instances in the network” (provided you don’t have any other servers)
For “Source IP ranges”, enter 0.0.0.0/0 to allow any IP addresses to connect
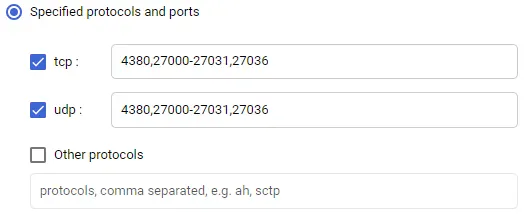
Check “tcp”, and enter 27015-27030,27036-27037
Check “udp”, and enter 4380,27000-27031,27036
Click “Create” to create your firewall rule.
Return to your server page by selecting “Compute engine > VM instances” from the top-left menu.
Setting up the server
Click on your server, and select “SSH” to open the terminal. You may need to allow pop-ups.
Wait for each of the following steps to complete before going onto the next. You will know when it is complete when the bottom of your terminal shows youremail@servername:~$
Paste the following into the terminal to update the repositories:
sudo -- sh -c 'dpkg --add-architecture i386; add-apt-repository multiverse; apt-get update; apt-get -y dist-upgrade'
Paste the following into the terminal to install linuxGSM:
wget -O linuxgsm.sh https://linuxgsm.sh && chmod +x linuxgsm.sh && bash linuxgsm.sh csgoserver
Type ./csgoserver install, and press “enter” when prompted to begin the installation. The server will begin installing the CSGO server, along with any other dependencies. This process will take approximately 20 minutes.
After installation, you may be prompted for a game token. Leave the field blank for now, and press enter.
Starting the server
Go to Steam Game Server Management, and create a new game token with app ID 730. Copy your Game Login Token.
In the terminal, enter nano start.sh to open a text editor
Paste the following into the file, and remember to replace [YOUR CODE] with your game token, and [YOUR IP] with the internal IP you noted earlier.
screen serverfiles/srcds_run -game csgo -usercon -strictportbind -ip [YOUR IP] -port 27015 +clientport 27005 +tv_port 27020 +sv_setsteamaccount [YOUR CODE] -tickrate 128 +map de_mirage +servercfgfile server.cfg -maxplayers_override 16 +mapgroup mg_active +game_type 0 +game_mode 1 +host_workshop_collection +workshop_start_map -authkey -nobreakpad
Press CTRL + S and CTRL + X to save and exit the text editor.
In the terminal, enter sh start.sh to start the CSGO server.
Congrats! Your vanilla competitive CSGO server is now running! To connect to your server, use [YOUR EXTERNAL IP]:27015. You can add this IP address to your favorite community servers, or connect directly using connect IP in your CSGO console.
I recommend shutting down the server when you’re not using it to save some of the free credit.
To exit the CSGO server console without shutting down the server, press CTRL + A and then D to disconnect the screen.
To return to the CSGO server console, type screen -r into your terminal.
To shut down the CSGO server, type quit into the CSGO server console.
Backing up your server
A good rule of thumb is to backup your server anytime you make changes to it.
To backup your server, go to your server’s details page.
Click “Create machine image” at the top
Name your backup, and click “Create”.
In the future, you can create a new server from that backup or revert to a previous image in case anything goes wrong.
Updating your server
You will need to update the server whenever CSGO is updated in order to play on it. To do so, simply enter ./csgoserver update into the terminal.
Server config
You will usually want to set up a password and RCON (remote connection) password for your server.
In the terminal, enter nano serverfiles/csgo/cfg/autoexec.cfg
Paste the following into the file (replace the passwords with your passwords):
hostname "CSGO Server"
rcon_password "YOUR_RCON_PASSWORD"
sv_password "SERVER_PASSWORD"
sv_cheats 0
sv_lan 0
exec banned_user.cfg
exec banned_ip.cfg
sv_minupdaterate 128
sv_mincmdrate 128
exec gamemode_competitive
Press CTRL + S and CTRL + X to save and exit.
Using plugins (with PracticeMode as an example)
You will need to restart your CSGO server after installation, so I suggest you install any plugins with the server off.
Edit: You can install SourceMod and MetaMod by using ./csgoserver mods-install. (Thanks u/goodpostsallday)
Installing MetaMod
Download the latest Linux build from the MetaMod Website
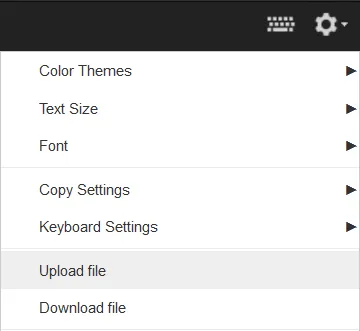
Upload the file to your server using the terminal’s built-in upload, found from the top-right cogwheel
In your terminal, type ls to view all files. You can highlight any text in your terminal and it will be copied to your clipboard, useful for pasting long file names.
To extract the MetaMod file, enter tar xvzf [FILENAME] -C serverfiles/csgo/. Make sure you use single quotes (’) if the file name has any spaces.
Installing SourceMod
Download the latest Linux build from the SourceMod Website
Upload the file to your server, and extract it using the same method as above
Installing PracticeMode
Download the latest zip release (not the source code) from the PracticeMode github
Upload the file to your server and extract it by entering the following into your terminal: unzip [FILENAME] -d serverfiles/csgo/
Setting up PracticeMode
Find your steam ID, formatted as STEAM_NUMBERS:NUMBERS:NUMBERS, by using status in console while connected to server, or a third-party website.
In your terminal, enter nano serverfiles/csgo/addons/sourcemod/configs/admins_simple.ini
Press the down arrow until you reach the bottom of the file
Type the following to grant yourself full administrator privileges:
"[YOUR STEAM ID]" "z"
To grant anyone else permissions to use PracticeMode, type the following:
"[SOME STEAM ID]" "g"
Using PracticeMode
To start PracticeMode while in a server, type .setup into the game chat.
For a full list of commands and features, visit PracticeMode Info
Good luck, and have fun!

